36 Yard Zero vs 50 Yard Zero, Side by Side in 3D
Both zeros put the dot on the bullet twice. A 36 yard zero crosses again near 305 yards and rises +5.5" on the way; a 50 yard zero crosses near 234 yards and only rises +2.3". See both paths on one range in 3D, change the ammo, barrel and optic height, and get the clicks to set either one.
Quick answer
- 36 yard zero: on the dot again at about 305 yards, highest +5.5" at 179 yards, 3.7" high at 100 (M193 55 grain from a 16 inch barrel, an EOTech EXPS 2.85 inches over the bore).
- 50 yard zero: on the dot again at about 234 yards, highest +2.3" at 146 yards, 1.8" high at 100.
- On a 10 inch plate (5 inches either side of the dot) the 36 yard zero stays on to about 138 yards and the 50 yard zero to about 296.
Source: GunPartPicker trajectory model (G1 drag, sea level, no wind) for 5.56 M193 55 gr FMJ at 3050 fps.
36 vs 50 yard zero on a 3D range
Pick a zero, add a second to compare, and fire. The red line is the line of sight from the dot; the bullet starts under it, rises through it at the near zero and falls back through it at the far zero. A dot marks each crossing, and the card in the corner gives where each zero comes back on and how high it rises.
36 YDvs50 YD
Zero
Back on the dot at 305 yd
Peak +5.5" at 179 yd
Back on the dot at 234 yd
Peak +2.3" at 146 yd
5.56 M193 55 gr FMJ at 3050 fps from 16", optic 2.85" over the bore. Your load will differ. Heights are stretched so a few inches show across 300 yards.
36 yard zero
- Crosses the dot
- 36 yd
- Back on the dot
- 305 yd
- Highest
- +5.5" at 179 yd
- At 25 yd
- 0.8" low
50 yard zero
- Crosses the dot
- 50 yd
- Back on the dot
- 234 yd
- Highest
- +2.3" at 146 yd
- At 25 yd
- 1.3" low
| Distance | 36 yd zero | 50 yd zero |
|---|---|---|
| 25 yd | -0.8" | -1.3" |
| 36 yd | 0.0" | -0.7" |
| 50 yd | +1.0" | 0.0" |
| 75 yd | +2.5" | +1.0" |
| 100 yd | +3.7" | +1.8" |
| 150 yd | +5.2" | +2.3" |
| 200 yd | +5.4" | +1.5" |
| 250 yd | +3.9" | -1.0" |
| 300 yd | +0.5" | -5.3" |
Look through the sight: where the bullet lands on the dot
Hold the dot on the middle of the target and pick a distance. The holes are where each zero puts the bullet, and the reticle is drawn at its real size, so you can see how much target it covers farther out.
- 36 yd zero: 3.7" high at 100 yards, 3.5 MOA over the dot.
- 50 yd zero: 1.8" high at 100 yards, 1.7 MOA over the dot.
- The 1 MOA dot covers 1.0" at 100 yards, and the ring is 71" across. The target is an IPSC cardboard, 18" wide.
How many clicks do I need? Tap where your group hit
Shoot a 3 to 5 round group at the red dot, then tap the center of the group on the target. The gold ring is where it should land for a 36 yard zero at the distance you shot.
Tap the target where your group landed.
Turn each turret the way its arrow says: UP moves the group up, R moves it right. Then shoot another group to check. Confirm at 36 yards, then at 300 yards if you can.
25 vs 36 vs 50 vs 100 vs 200 yard zero: which should I use?
Inches above (+) or below (-) the dot for each zero with 5.56 M193 55 gr FMJ from a 16" barrel and an EOTech EXPS 2.85" over the bore.
| Zero | On the dot at | Highest | On a 10" plate to | At 25 yd |
|---|---|---|---|---|
| 25 yard zero | 25 and 399 yd | +12.2" at 229 yd | 75 yd | dead on |
| 36 yard zero | 36 and 305 yd | +5.5" at 179 yd | 138 yd | 0.8" low |
| 50 yard zero | 50 and 234 yd | +2.3" at 146 yd | 296 yd | 1.3" low |
| 100 yard zero | Just touches at 100 yd | At 100 yd | 244 yd | 1.7" low |
| 200 yard zero | 60 and 200 yd | +1.3" at 132 yd | 275 yd | 1.5" low |
| Distance | 25 yd zero | 36 yd zero | 50 yd zero | 100 yd zero | 200 yd zero |
|---|---|---|---|---|---|
| 25 yd | 0.0" | -0.8" | -1.3" | -1.7" | -1.5" |
| 50 yd | +2.6" | +1.0" | 0.0" | -0.9" | -0.4" |
| 100 yd | +7.0" | +3.7" | +1.8" | 0.0" | +1.0" |
| 150 yd | +10.1" | +5.2" | +2.3" | -0.3" | +1.2" |
| 200 yd | +11.9" | +5.4" | +1.5" | -2.1" | 0.0" |
| 250 yd | +12.0" | +3.9" | -1.0" | -5.4" | -2.8" |
| 300 yd | +10.3" | +0.5" | -5.3" | -10.7" | -7.6" |
50 yards is the default for a red dot carbine. It never rises more than 2.3" over the dot, so you hold the dot on what you want to hit from the muzzle out to about 234 yards, and it's only 5.3" low at 300.
36 yards trades a higher arc for reach: back on the dot near 305 yards, but 3.7" high at 100 yards. It suits a rifle that shoots man sized targets out to 300 more than one that shoots small steel at 100.
200 yards is the flattest of them: the bullet crosses the dot on the way up near 60 yards, never rises more than 1.3" over it, and comes down through it at 200. It's 1.0" high at 100 and 7.6" low at 300. Set it at 100 yards with the group 1.0" high, then confirm at 200.
100 yards is the usual zero for an LPVO or a scope with a holdover reticle, because the reticle's drop marks assume it. 25 yards is better as a short range to set one of the others than as a zero.
How to zero a red dot or LPVO, step by step
- Mount the optic and torque the mount to spec. A loose mount never holds a zero. Pick the zero you want from the table above.
- Get stable: shoot from a bench or prone off a bag or bipod, with the same ammo you'll carry. Different loads hit in different places.
- Shoot a 3 to 5 round group at the center of the target at 25 yards (or your zero distance). Aim at the same spot every shot and don't chase single holes.
- Find the center of the group and measure how far it is from where it should land. For a 50 yard zero at 25 yards that's 1.3" low, not on the dot. Tap it on the target above to get the clicks.
- Turn the turrets the clicks it gives you, the way each turret's arrow points (UP moves the group up, R moves it right), and shoot another group.
- Repeat until the group lands where it should, then confirm at the real zero distance. A zero set at 25 yards is a starting point; the confirm is the zero.
How far does one click move the group?
Optics adjust in angles, so a click moves the group more the farther the target. MOA is about 1.047 inches at 100 yards; one MIL is 3.6 inches at 100 yards.
| One click | At 25 yd | At 50 yd | At 100 yd |
|---|---|---|---|
| 1/2 MOA | 0.13" | 0.26" | 0.52" |
| 1/4 MOA | 0.07" | 0.13" | 0.26" |
| 1 MOA | 0.26" | 0.52" | 1.05" |
| 0.1 MIL | 0.09" | 0.18" | 0.36" |
Most rifle red dots move 1/2 MOA a click; some move 1 MOA. LPVOs are usually 1/2 MOA or 0.1 MIL. It's printed on the turret cap or in the manual. At 25 yards a 1/2 MOA click moves the group only about an eighth of an inch, which is why zeroing at 25 takes so many clicks.
Why does optic height change the zero?
The dot sits above the bore, so the barrel points up at the line of sight and the bullet climbs through it. A taller optic makes it climb at a steeper angle to meet the dot at the same distance, so it rises higher in between and comes back down through the dot farther out. Going from a 2.6" absolute co-witness to an LPVO 3.1" over the bore pushes a 50 yard zero's far zero from about 217 yards out to 250 yards; set your own height in the tool and watch the path move.
Up close, the height is the whole story: at 5 yards a 50 yard zero lands 2.5" low and a 36 yard zero 2.4" low, nearly the full optic height. That's the mechanical offset to hold for on a close, small target.
Which sight suits which zero?
The zero is about the bullet; the sight decides how precisely you can hold. A bigger dot covers more target farther out, and a scope's drop marks only work with the zero they were drawn for.
| Sight | Over the bore | Best zero | Why |
|---|---|---|---|
| Red dot (2 MOA), absolute co-witness | 2.6" | 50 yd | Rises only 1.9" over the dot and back on near 217 yards, so you hold dead on out to 200. |
| Red dot, lower 1/3 | 2.85" | 50 yd, or 36 yd for 300 | The taller mount pushes the far zero out to about 234 yards. A 36 yard zero reaches 305 yards but rides 5.5" high. |
| EOTech (68 MOA ring, 1 MOA dot) | 2.85" | 50 yd | The 1 MOA dot is the precise aim point for small targets; the ring is for fast work up close. |
| Prism with a drop reticle | 2.6" to 3" | The one in its manual | Its drop marks are drawn for one zero and one load, so zero where the manual says and check the marks on paper. |
| LPVO (1-6x, 1-8x) | 3.1" | 100 yd | Its drop marks and hashes assume a 100 yard zero, and the magnification lets you hold finely past 300. |
A 2 MOA dot covers about 2.1" at 100 yards and 6.3" at 300. Pick a sight in the look through the sight view above to see it on a target at each distance.
Red dots and LPVOs builders pick
Rifle red dots and holographic sights
Ranked by what builders add most, in stock first. One listing per model.


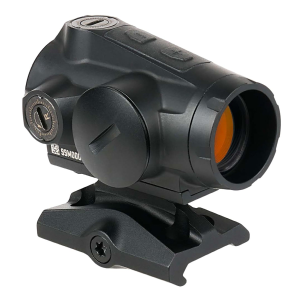

LPVOs (1-4x to 1-10x)
Ranked by what builders add most, in stock first. One listing per model.


Each zero on its own page
Frequently Asked Questions
Is a 36 yard zero or a 50 yard zero better?
For most red dot carbines inside 200 yards, the 50 yard zero: it never rises much more than 2.3" over the dot, so you hold dead on from the muzzle to about 234 yards. The 36 yard zero reaches farther (back on at about 305 yards) but sits 3.7" high at 100 yards and 5.5" at its top, which matters on small targets. Those figures are for M193 55 grain from a 16 inch barrel, an EOTech EXPS 2.85 inches over the bore.
Where should I hit at 25 yards for a 36 or 50 yard zero?
With M193 55 grain from a 16 inch barrel, an EOTech EXPS 2.85 inches over the bore: 0.8" low for a 36 yard zero and 1.3" low for a 50 yard zero. That's under an inch apart, so confirm at the real distance before you trust it.
Is the 36 yard zero the same as a 300 yard zero?
Close. With M193 from a 16 inch barrel the 36 yard zero comes back on at about 305 yards, so it's often called a 36/300. A lower optic pulls it in: with a 2.6 inch absolute co-witness height instead of an EOTech's 2.85 inches it crosses again near 285 yards.
Why is a 50 yard zero called a 50/200?
Because the bullet crosses the dot twice: once going up at 50 yards and again coming down near 234 yards. The second crossing moves with the load and the optic height, so it lands anywhere from about 200 to 250 yards on a 5.56 carbine.
What is the best zero for an AR-15 red dot?
A 50 yard zero for most carbines. With 5.56 and an EOTech height optic the bullet rises at most about two and a half inches over the dot and comes back onto it near 235 yards, so you hold dead on for anything you'd shoot with a red dot. A 36 yard zero reaches farther, near 300 yards, but rises about five and a half inches over the dot near 180 yards.
Can I zero a red dot at 25 yards?
Yes, as a starting point. Put the group under the dot (about 1.3 inches low for a 50 yard zero with 5.56 and an EOTech height optic) rather than on it, then confirm at 50 yards. The tool above gives the exact offset for your ammo and optic height.
How many clicks to move 1 inch at 25 yards?
About 8 clicks with a 1/2 MOA optic, 15 with a 1/4 MOA scope, 4 with a 1 MOA dot and 11 with a 0.1 MIL scope. A click is an angle, so it moves the group four times as far at 100 yards.
Which way do I turn the turret?
The way the arrow on the turret points for the direction you want the group to move. If the group is low, turn the elevation turret toward UP; if it's left, turn the windage turret toward R. You move the bullet to the dot, not the dot to the bullet.
Should I zero an LPVO at 50 or 100 yards?
100 yards if its reticle has holdover marks, since the marks are built around a 100 yard zero. Some LPVO reticles are designed for 50 yards or 200 yards; check the reticle manual. A 50 yard zero works fine on a 1-4x or 1-6x run like a red dot.
Does a suppressor change my zero?
Usually a little, often an inch or two at 100 yards, and not always the same direction on two rifles. Zero with the can on if it lives on the gun, or note where the group moves when you put it on.
What is the far zero?
The second distance where the bullet crosses the line of sight. The barrel points up through the dot, so the bullet rises through it at the near zero, arcs over, and falls back through it at the far zero. A 50 yard zero's far zero is around 200 to 250 yards; a 36 yard zero's is near 300.
Cite this tool: GunPartPicker, “36 Yard Zero vs 50 Yard Zero, Side by Side in 3D”, https://gunpartpicker.net/tools/optic-zero/36-vs-50-yard-zero. Trajectories from a G1 drag model with rounded muzzle velocities; check yours on paper Free to cite with attribution.
Read next
All guides →


More Gun Tools
- TuningTwist Rate CalculatorPick a bullet and a twist rate, get the Miller stability factor, then see barrels with that twist and ammo loaded with that bullet, with today's price per round.
- LegalBarrel and Overall Length CheckerEnter barrel length, muzzle device and how the back end is configured, and see whether the build is a rifle, a short barreled rifle, a pistol or an AOW under federal law, with the barrels in stock at that length.
- PlanningAR Build Cost CalculatorHow much does it cost to build an AR-15? Pick caliber, barrel length, stock or brace and optic, then drag both edges of the price band from the cheap end to the top end. Every slot fills with the part builders add most that is in stock, priced live. The headline total is the core rifle, optics and extras are priced separately, and beside them sits what builders really pay per slot, measured from real part picks. Roll a random build, or open yours in the builder in one click. Computed from over 1 million AR parts selected on GunPartPicker since 2020.
- LegalGun Travel CheckerCan I bring my gun to another state? Pick where you start, where you are going and what is coming along: carry pistol, AR-15, magazines, suppressor, SBR, brace, forced reset or binary trigger, hollow points. Every state on the route is checked for transporting firearms across state lines: magazine limits, assault weapon bans, NFA rules, carry permit type and trigger bans, with what to do before the state line.
- CompatibilityMuzzle Thread CheckerPick your barrel's caliber and platform, get the standard thread pitch, and see every muzzle device and suppressor in the catalog that actually threads on, with live prices.
- CompatibilitySuppressor Mounts (3D)Put a can on its mount in 3D. Compare SilencerCo ASR, Dead Air KeyMo, SureFire Fast-Attach, HUXWRX QD, HUB 1.375x24 and direct thread: what goes on the barrel, what is on the can, how it locks and which cans fit which mounts. Cut it open to see the taper and the baffles, then shop the mounts and cans in stock.
- CompatibilityDI vs Piston (3D)Watch a direct impingement AR-15 and a gas piston HK416 fire in slow motion x-ray 3D. Follow the gas from the port back into the carrier, or into a piston that kicks an op rod, see which bolt runs hot, and compare weight, cleaning, suppressed use, carrier tilt and cost.
- CompatibilityFRT and Binary Trigger PickerChoose your platform and see every forced reset trigger, binary trigger and Super Safety the catalog carries for it, what the host needs to run one, and where each is in stock.
- CompatibilityGlock Red Dot Fit CheckerPick how your Glock slide is cut and see which red dots mount directly, which need a plate, and the plates and optics in stock right now.
- CompatibilityGlock Size ComparisonPick any two Glocks and see them to scale as real photos sized to Glock's published dimensions, side by side, from behind and as an X-ray, with the difference in length, height, width and weight in one line and the pistols in stock for each.
- CompatibilityP385 Size ComparisonSee the SIG P385 CARRY, COMP and FULL to scale against the P365-XMACRO, the P320 and the Glock 19, 17, 45 and 43X, as real photos sized to the published length and height, with every dimension and where to order one.
- Paint plannerGun Paint PlannerRattle can guns online before you spray. Paint, stencil and camo a real photo of about 1,800 guns: AR-15s, AR-10s, AR-9s, AKs, every Glock, pistols, shotguns and bolt action rifles, the way the rattlecanned guns on r/rattlecannedguns are done, with Krylon, Rust-Oleum, Aluma-Hyde, DuraCoat and Cerakote colors, then get the cans to buy in spray order.
- TuningBuffer Weight CalculatorEnter your gas system, barrel length, buffer tube and ammo, add a suppressor or a fast trigger, and get the buffer weight to start with plus the buffers in stock that match.
- TuningBuffer System (3D)Watch an AR-15 cycle in slow motion, cut open: gas drives the bolt carrier back, the bolt unlocks and throws the brass, the buffer and spring soak it up and send it home. Swap carbine, H, H2 and H3 buffers, add gas or a suppressor, and see the carrier speed, where the brass lands and when it short strokes.
- LegalSBR Planner (3D)Set the barrel anywhere from 7.5 to 16 inches, put a stock, a brace or a folder on the back, pin a muzzle device or slide on a can. The ruler under the rifle shows whether you've cleared the 16 inch barrel line and the 26 inch overall line. Pick your state for its SBR, suppressor and assault weapon rules, then price every part and open the build in one click.
- PlanningNight VisionLook around a real 360 degree scene through Gen 1, Gen 2+, Gen 3 green and white phosphor tubes, digital night vision and thermal. Turn the moon down from full to overcast, switch on an IR light, compare two devices side by side. Or walk a 3D farm at night and spot the people, hogs and deer hiding in it. Then see the PVS-14, PVS-31, GPNVG-18 and the thermal scopes people buy, with prices.