An AR-15 is two halves held together by two pins. The lower holds the trigger, the grip and the stock. The upper holds the barrel, the bolt and the sights. You can buy either half complete, build either one from parts, or mix the two.
Most first builds should buy a complete upper and assemble the lower. That's also what our builders do.
Upper and lower receiver picks on GunPartPicker, July 1 to September 30, 2026
| Metric | Value |
|---|---|
| Uppers | About 4 to 1 |
| Lowers | Close to even |
| Hardest part | The upper |
The parts builders pick most
We list the part picked by the most builders in each slot on GunPartPicker from July 1 to September 30, 2026, with its share of that slot.
| Slot | Most picked | Share of slot |
|---|---|---|
| Lower receiver | Smith & Wesson M&P15 complete lower | about 8% |
| Upper receiver | BCM mid length barreled upper with MCMR rail | about 7% |
| Bolt carrier group | BCM M16 bolt carrier group | about 19% |
| Trigger | Geissele SSA-E X | about 18% |
| Buffer tube kit | Geissele Super 42 buffer tube assembly | about 20% |
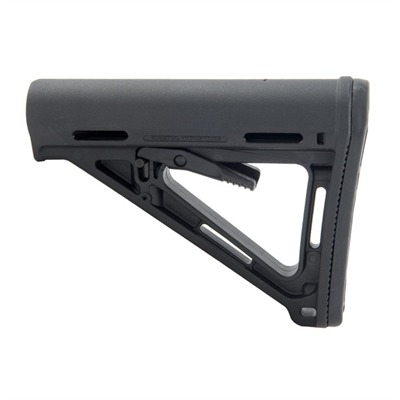
| Stock | Magpul MOE carbine stock | about 13% |
| Barrel | Rosco Bloodline 14.5 inch M4 | about 7% |
| Gas block | Strike Industries Collar adjustable | about 22% |
| Gas tube | WMD Guns Nitromet mid length | about 21% |
| Handguard | Midwest Industries 15 inch quad rail | about 7% |
| Charging handle | Radian Raptor with Talon safety combo | about 12% |
| Muzzle device | HUXWRX 556 QD flash hider | about 8% |
| Optic | EOTech HHS green dot and 3x magnifier combo | about 18% |
Low shares in the lower, upper, barrel and handguard slots mean builders spread out there. The BCG, trigger, buffer kit and gas block slots have clear favorites.
What we like about this list: most of these leaders are in stock at more than one store today.
Watch out for: the Geissele buffer kit leader is the H3 in Desert Dirt, and it's out of stock. The H2 in black is in stock and drew the second most picks. The Geissele trigger and the HUXWRX are each down to one store this week.




You can drop any of these into the AR-15 builder to see price and compatibility for your full build.
Complete upper or build your own?
We'd buy a complete upper for a first build. The upper is where the precise work lives: barrel nut torque, gas block alignment over a hole you can't see, and headspace. A factory upper arrives with all three done and checked.
Our builders agree. They pick complete or barreled uppers about four times as often as stripped ones. Lowers are different. Complete and stripped lowers are picked at close to the same rate, because a lower takes hand tools and patience, not gauges.
Building the upper yourself makes sense when you want a barrel, handguard and gas block that no factory upper combines. Plan on a vise block and a torque wrench before you start.
Pick your barrel and gas system first
Your barrel decides several other parts. Its gas system length sets the gas tube, and its diameter at the gas port sets the gas block size. Most AR-15 barrels take a 0.750 inch block, but some heavier profiles need 0.875 or 0.936. Check the listing before you order.
Gas system length runs pistol, carbine, mid length and rifle, from shortest to longest. Longer systems for a given barrel length run softer. The WMD mid length tube leads its slot because mid length is the common pick on 14.5 and 16 inch barrels.
If you want to run a suppressor, an adjustable gas block lets you turn the gas down so the rifle doesn't overgas behind the can. That's the main reason the Strike Industries Collar leads its slot.
The full parts list
You need every one of these, whether you buy them loose or as part of a complete half.
Lower half: stripped lower receiver, lower parts kit (trigger, hammer, disconnector, springs, pins, safety, magazine catch, bolt catch, takedown and pivot pins), pistol grip, buffer tube, end plate, castle nut, buffer, buffer spring, and a stock.
Upper half: stripped upper receiver with forward assist and dust cover, barrel, barrel nut, gas block, gas tube, handguard, muzzle device, bolt carrier group, and a charging handle.
On top: an optic or iron sights.
The lower receiver is the serialized part, so it's the only one that ships to a gun dealer for a background check. Everything else ships to your door in most states.
Tools you'll need
You can build a lower with a punch set and patience. The upper needs real tools.
- AR armorer's wrench. Tightens the castle nut and most barrel nuts.
- Roll pin punches and starter punches. The bolt catch and trigger guard pins are where receivers get scratched.
- Small hammer, nylon or brass faced.
- Vise with upper and lower receiver blocks. Never clamp a receiver bare.
- Torque wrench in foot pounds, for the barrel nut and castle nut.
- Headspace gauges, go and no go, if you pair a new bolt with a new barrel yourself.
- Grease for the barrel extension threads and a little thread locker for gas block screws.
We'd buy a complete upper first. With one, you can skip the barrel tools and headspace gauges entirely.
Step 1: build the lower
We work from the inside out, because each part traps or supports the next.
- Magazine catch. Push the button through, thread the catch on from the other side, and spin it until the button sits just proud of the receiver.
- Bolt catch. Drop the spring and plunger in, then drive the roll pin in with a starter punch. Tape the receiver around the pin hole first.
- Front pivot pin. The detent and spring go into a small hole at the front. Hold them down with a clevis pin or a pivot pin tool and slide the pin across.
- Trigger group. Trigger, disconnector and spring go in first, held with the trigger pin. Then the hammer and its spring on the hammer pin. Watch the hammer spring legs. They sit on top of the trigger pin.
- Safety selector. Slide it in from the left with the hammer cocked. The detent drops into a hole under it, and the spring sits in the grip.
- Pistol grip. Screw it on so it captures the selector spring. Don't overtighten.
- Trigger guard. Pin it with the receiver supported on a block so the ears don't crack.
Step 2: buffer tube and stock
The buffer tube kit closes the back of the lower and captures the rear takedown pin.
- Drop the takedown pin detent and spring into the back of the receiver, and slide the takedown pin in.
- Drop the buffer retainer and its spring into their hole. Thread the buffer tube in until it just holds the buffer retainer pin down. The retainer sits under the tube's lip.
- Slide the end plate on so its tab captures the takedown pin detent spring.
- Tighten the castle nut to about 38 to 40 foot pounds, and stake it if your end plate has staking notches.
- Drop in the buffer spring and buffer, and slide the stock onto the tube.
Step 3: build the upper
If you bought a complete upper, skip to Step 4.
- Forward assist and dust cover go on first, each with a roll pin.
- Barrel. Slide the barrel extension into the upper with its index pin in the notch at the top. Grease the receiver threads.
- Barrel nut. Torque it to your handguard maker's spec. A mil spec nut runs 30 to 80 foot pounds, and you tighten until the next notch lines up for the gas tube.
- Gas tube and gas block. Pin the tube into the block, slide it through the barrel nut into the upper, and line the block up over the barrel's gas port. Use thread locker on the set screws, or pin it if the barrel is dimpled.
- Handguard. Mount it over the barrel nut per its instructions.
- Muzzle device. Thread it on with its washer and time the ports or prongs. Torque per the device maker.
Match your gas tube to your barrel's gas system. A mid length barrel takes a mid length tube. That's why the WMD mid length tube leads its slot.
Step 4: bolt, charging handle and headspace
Slide the charging handle into the upper, then the bolt carrier group behind it.
If you put a new bolt into a new barrel yourself, check headspace now. The bolt should close on a go gauge and not close on a no go gauge. A complete upper or a barrel and bolt sold as a matched set are already checked at the factory.
Step 5: join the halves, add an optic, function check
Pin the upper to the lower with the front pivot pin and rear takedown pin. Mount your optic and confirm it holds zero at the range.
Then run a function check with the rifle empty:
- Put it on safe and pull the trigger. The hammer shouldn't fall.
- Switch to fire and pull. The hammer should fall.
- Hold the trigger back, cycle the charging handle, then release the trigger slowly. You should hear and feel a click as the trigger resets.
- Pull again. The hammer should fall.
If any step fails, stop and recheck the trigger group before you load a round.
Mistakes we see on first builds
- Wrong gas tube length for the barrel. The rifle short strokes or beats itself up.
- Gas block off the port. The block has to sit squarely over the hole. Mark the port with a marker before you slide the block on.
- Bolt catch roll pin driven without support. That pin leaves the scratch on most first lowers. Tape it and use a starter punch.
- Hammer spring on backwards. The legs ride on top of the trigger pin. If the hammer feels weak, check this first.
- No staking. An unstaked castle nut backs off and the stock starts to wobble.
- Mixing a new bolt and barrel without gauges. Buy them as a matched set, or check headspace yourself.
How we pick
Each slot's pick is the part chosen by the most builders on GunPartPicker from July 1 to September 30, 2026, counted once per builder. Shares are that part's share of builders in its slot. Prices and stock are from the stores we track, checked when we last updated this guide.
Filed underAR-15/How-To/Build Guide
FAQ
Frequently asked questions
What parts do I need to build an AR-15?
- A lower receiver and lower parts kit, pistol grip, buffer tube kit with buffer and spring, and a stock for the lower. An upper receiver, barrel, barrel nut, gas block, gas tube, handguard, muzzle device, bolt carrier group and charging handle for the upper. Then an optic or iron sights.
What tools do I need to build an AR-15?
- An AR armorer's wrench, roll pin and starter punches, a small nylon or brass hammer, a vise with receiver blocks and a torque wrench. Add go and no go headspace gauges if you pair a new bolt and barrel yourself. A complete upper skips most of the upper tools.
Is it hard to build an AR-15?
- The lower is a few hours with a punch set. The upper is harder because barrel nut torque, gas block alignment and headspace all have to be right. That's why GunPartPicker builders pick complete or barreled uppers about four times as often as stripped ones.
Do I need an FFL to build an AR-15?
- The lower receiver is the serialized part, so it transfers through a licensed dealer with a background check. The other parts ship to your door in most states. Check your state's rules before you order.
What torque for an AR-15 castle nut?
- About 38 to 40 foot pounds, then stake it if the end plate has staking notches. Barrel nut torque depends on your handguard; a mil spec nut runs 30 to 80 foot pounds, aligned to the next notch for the gas tube.
How do I function check an AR-15?
- With the rifle empty: on safe, the hammer shouldn't fall. On fire, it should. Hold the trigger back, cycle the charging handle, then release slowly and listen for the reset click. Pull again and the hammer should fall. Stop and recheck the trigger group if any step fails.
What are the most popular AR-15 parts?
- On GunPartPicker from July to September 2026, the clearest favorites were the BCM M16 bolt carrier group, the Geissele SSA-E X trigger, the Geissele Super 42 buffer tube kit and the Strike Industries Collar gas block, each with roughly a fifth of its slot.
Written by
GPP Editorial TeamAR Build Specialists
GunPartPicker guides are powered by data from real builds. What builders actually select tells the story.
Read next
All guides → BUFFERS & RECOIL/09.17.26AR9 FRT Build: Blowback Tuning for a Forced Reset Trigger
 LOWER RECEIVERS/08.16.26California-Legal AR-15 (2026): Featureless vs. Fixed-Mag & What to Buy
 BUFFERS & RECOIL/09.29.26What Your AR-15 Actually Needs to Run an FRT
 HANDGUARDS/09.18.26Suppressor Ready Handguards: Inner Diameter and Tucked Cans
 IRON SIGHTS/10.13.26Glock Red Dot Plates: What Actually Fits What
 CLONE BUILD/10.14.2613 Hours Build: The Contractor Carbine
 CLONE BUILD/10.14.26Act of Valor build: the Bandito Platoon SEAL carbine
 CLONE BUILD/10.15.26Black Hawk Down build: the Ranger and Delta carbines on screen
Tools for this guide
- Compatibility toolFree Float vs Drop In Handguard (3D)Watch an AR-15 free float handguard go on its barrel nut in 3D, lean on a free float and a drop in handguard to see which one moves the barrel, and lock an M-LOK rail section in. Plus M-LOK vs KeyMod and what length fits your barrel.
- Compatibility toolHow a BCG Works (3D)Watch an AR-15 bolt carrier group unlock, extract and lock again in slow motion 3D, then take it apart part by part. See the cam pin turn the bolt out of the barrel extension, and what each part does.
- Compatibility toolHow the Gas System Works (3D)Watch a shot's gas go up an AR-15's gas port, through the gas block and back down the gas tube to the bolt carrier in slow motion 3D. Turn it down with an adjustable gas block, and see where the port sits on pistol, carbine, mid length and rifle gas.